Have you ever wanted to build a timber gate but didn’t know where to start? Well, you’re in luck! In this article, we’re going to discuss how to build a timber gate step by step. Whether you’re a seasoned DIY enthusiast or a beginner looking for a new project, we’ve got you covered. So, grab your tools and let’s get started!
First things first, let’s talk about the materials and tools you’ll need for this project. You’ll obviously need timber boards, preferably pressure-treated to withstand the outdoor elements. Additionally, you’ll need screws, hinges, a latch, and a drill. Don’t worry if you don’t have all the tools – we’ll cover alternative options in the article.
Now that we have all the necessary materials, it’s time to dive into the step-by-step process of building a timber gate. From measuring and cutting the timber to assembling and finishing the gate, we’ll guide you through each stage. By the end of this article, you’ll have a beautiful timber gate that you can be proud of. So, let’s get building!
Build a Timber Gate: Step-by-Step Guide
Building your own timber gate can be a rewarding project that not only adds functionality to your property but also enhances its aesthetic appeal. Whether you’re looking to create a gate for your garden, driveway, or other areas, this step-by-step guide will provide you with all the information you need to construct a timber gate from scratch. From choosing the right timber to adding decorative elements, here’s everything you need to know to build a timber gate on the cheap.

Choosing the Right Timber
Before you begin your timber gate project, it’s important to select the right type of timber. There are several options available, each with its own unique characteristics and durability. Some common types of timber used for gates include pine, cedar, redwood, and hardwoods like oak and teak. Consider factors such as the climate, the desired look, and the durability requirements to help you make the best choice.
Considerations for Durability
When choosing timber for your gate, consider its durability. You want a timber that can withstand the harsh outdoor conditions and last for many years to come. Look for timber that is resistant to rot, decay, and insect damage. Additionally, consider the maintenance requirements and how often you’re willing to treat or stain the timber to ensure its longevity.

Cost-Effective Options
If you’re on a budget, there are cost-effective timber options available that can still provide you with a durable and attractive gate. Softwoods like pine are usually more affordable than hardwoods and can be treated to increase their durability. Additionally, using recycled timber or reclaimed wood can be a great way to save money while also adding a rustic charm to your gate.
Gathering the Necessary Tools and Materials
Before you begin the construction process, gather all the necessary tools and materials. Having everything on hand will make the project go smoother and save you from making multiple trips to the hardware store. Here are the essential tools and materials you will need:
Essential Tools Needed:
- Tape measure
- Circular saw or handsaw
- Drill
- Screwdriver
- Chisel
- Level
- Clamps
- Hammer
- Safety goggles
- Gloves
Materials Required for Construction:
- Timber boards for the frame and rails
- Fence posts
- Hinges and screws
- Latch or lock
- Wood glue
- Sandpaper
- Protective finish (such as varnish or paint)
- Braces for added support
- Decorative elements (optional)

Taking Accurate Measurements
Accurate measurements are crucial when building a timber gate. Take the time to carefully measure the area where the gate will be installed to ensure a perfect fit. Here are the steps to determine the gate dimensions and mark the fence posts:
Determining the Gate Dimensions:
- Measure the width of the opening where the gate will be installed. Subtract a small amount, about 1/2 inch, to allow for clearance and ensure the gate opens and closes smoothly.
- Measure the desired height for your gate. Keep in mind any existing structures or obstacles that may affect the gate’s height.
Marking the Fence Posts:
- Measure and mark the location for the fence posts on either side of the gate opening. Make sure they are evenly spaced and aligned.
- Use string or a straight edge to connect the marks and create a guide for installing the posts.
Preparing the Timber
Once you have the necessary measurements, it’s time to prepare the timber for construction. This involves cutting the timber to size and sanding and smoothing the surfaces for a finished look.
Cutting the Timber to Size:
- Using a circular saw or handsaw, cut the timber boards to the dimensions determined earlier for the gate frame and rails.
- Be sure to make precise cuts and double-check the measurements before cutting to avoid any errors.
Sanding and Smoothing the Surfaces:
- Use sandpaper or a sanding block to smooth out any rough edges or surfaces on the timber.
- Pay special attention to the areas where the different timber pieces will come together to ensure a seamless fit.

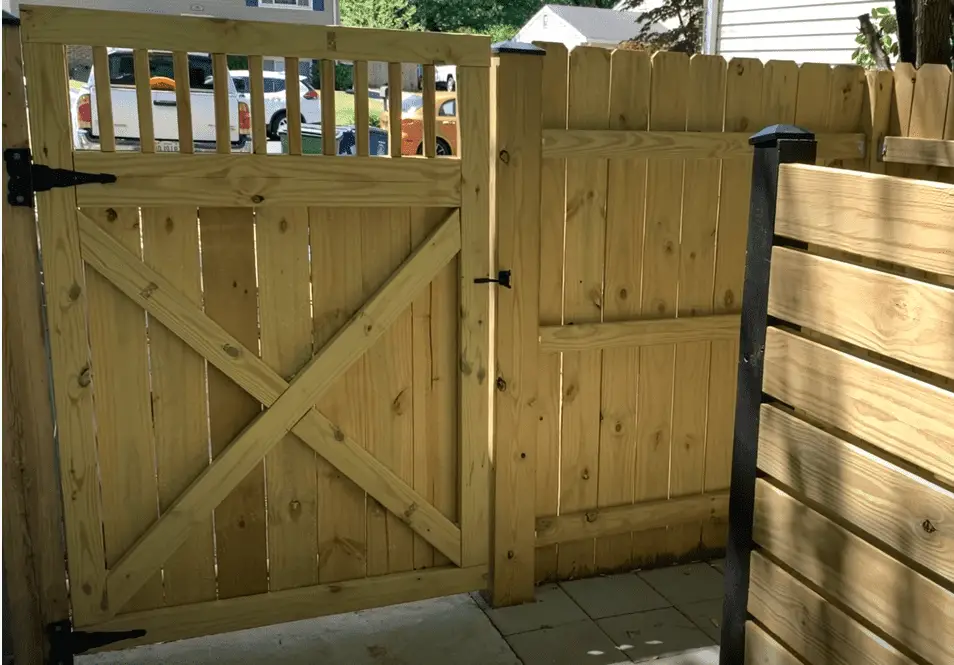
Assembling the Gate Frame
The gate frame serves as the backbone of your timber gate and provides the structural support. Here’s how to assemble the top and bottom rails and attach the vertical rails:
Creating the Top and Bottom Rails:
- Lay out the timber boards for the top and bottom rails on a flat surface.
- Apply wood glue to the ends that will be joined together and secure them with clamps.
- Allow the glue to dry according to the manufacturer’s instructions before moving on to the next step.
Attaching the Vertical Rails:
- Measure and mark the desired spacing for the vertical rails along the top and bottom rails.
- Apply wood glue to the ends of the vertical rails that will be attached to the top and bottom rails.
- Secure the vertical rails in place using screws, ensuring they are evenly spaced and aligned.
Adding Support Braces
To enhance the strength and stability of your timber gate, adding support braces is essential. Here’s how to determine their placement and install them properly:
Determining the Placement of Braces:
- Measure and mark the desired location for the support braces on the gate frame.
- Consider adding braces at approximately one-third and two-thirds of the height of the gate for optimal support.
Installation of Braces:
- Cut the support braces to the desired length.
- Attach the braces to the gate frame using screws, making sure they are securely fastened.

Attaching the Gate to Fence Posts
Once you have assembled the gate frame, it’s time to attach it to the fence posts. Here’s how to position and align the gate and secure it with hinges:
Positioning and Aligning the Gate:
- Place the gate frame between the fence posts, ensuring it is centered and level.
- Use clamps or a helper to hold the gate frame in place while you attach it to the fence posts.
Securing the Gate with Hinges:
- Attach the hinges to the gate frame and the fence posts, following the manufacturer’s instructions.
- Make sure the hinges are properly aligned and securely fastened to ensure smooth operation of the gate.
Installing a Latch or Lock
To secure your timber gate, installing a latch or lock is essential. Consider the following steps when choosing and installing the latch:
Choosing the Right Type of Latch:
- Determine the level of security and functionality you require for your gate.
- Common types of latches include gravity latches, padlock latches, and automatic latches. Choose one that best suits your needs.
Proper Installation of the Latch:
- Follow the manufacturer’s instructions to install the latch on the gate frame.
- Ensure that the latch aligns properly with the receiving mechanism on the fence or gatepost.
Applying a Protective Finish
To protect your timber gate from the elements and enhance its lifespan, applying a protective finish is necessary. Here’s how to select the suitable finish and apply it correctly:
Selecting the Suitable Finish:
- Consider factors like the desired look, protection level, and maintenance requirements when choosing a finish.
- Options include varnish, paint, or wood stain. Choose one that complements your overall aesthetic and provides the necessary protection.
Applying the Finish for Protection:
- Prepare the timber surface by sanding it lightly to ensure proper adhesion of the finish.
- Apply the finish according to the manufacturer’s instructions, using a brush, roller, or sprayer.
- Allow the finish to dry completely before moving or using the gate.
Ensuring Gate Stability
To ensure your timber gate is stable and functions properly, it’s important to test its stability and make adjustments if necessary. Follow these steps to ensure your gate is secure:
Testing the Gate’s Stability:
- Open and close the gate multiple times to check for any wobbling or misalignment.
- Pay attention to any areas that feel weak or unstable when pushing or pulling on the gate.
Making Adjustments if Necessary:
- If the gate feels unstable or misaligned, review the construction and installation steps to identify any areas that may need adjustment.
- Secure any loose screws, reinforce weak points, or make additional support modifications as needed.
Adding Decorative Elements
Once your timber gate is structurally sound, you can add decorative elements to enhance its appearance. Consider the following options for adding style:
Options for Adding Style:
- Attach decorative trim or moldings to the gate frame for a more refined look.
- Paint or stain the gate in a color or finish that complements your property’s overall design.
Enhancing the Gate’s Appearance:
- Add decorative ironwork, such as hinges or handles, for a unique and personalized touch.
- Install decorative hardware, such as metal accents or carvings, to further enhance the gate’s appearance.
Regular Maintenance and Upkeep
To keep your timber gate in optimal condition, regular maintenance and upkeep are necessary. Follow these steps to ensure its longevity:
Cleaning and Treating the Timber:
- Regularly clean the gate with a mild detergent and water to remove dirt and debris.
- Treat the timber with a protective finish every few years or as recommended by the manufacturer to prevent rot and damage.
Inspecting for Damage:
- Periodically inspect the gate for any signs of damage, such as rot, cracks, or loose components.
- Repair or replace any damaged parts promptly to prevent further deterioration.
Timber Gate Security
In addition to its functionality and aesthetic appeal, timber gates can also provide security to your property. Consider the following aspects when planning security measures for your gate:
Considerations for Security Measures:
- Assess the level of security required based on your property’s location and potential threats.
- Consider additional features like security cameras, access control systems, or motion sensor lights for added security.
Choosing and Installing Security Features:
- Research and choose security features that align with your budget and security needs.
- Follow the manufacturer’s instructions to properly install the chosen security features for optimum performance.
Conclusion
Building your own timber gate can be a rewarding and cost-effective project. By following this step-by-step guide, you can create a functional and visually appealing gate that suits your needs and budget. From choosing the right timber to adding decorative elements, each aspect of the construction process has been detailed to help you successfully build your own timber gate. With proper maintenance and regular upkeep, your timber gate will provide you with security and enhance the overall look of your property for years to come.